PushToCompute CI/CD flow for Xilinx Alveo
Custom JARVICE applications utilizing Alveo accelerators can be created following the PushToCompute CI/CD flow. The Xilinx Runtime (XRT) supports the following Linux distributions:
- Ubuntu Xenial (16.04)
- Ubuntu Bionic (18.04)
- CentOS 7.4.1708
The examples on this page will walk through how to create minimal and desktop environments. Each example will create an AppDef to specify available machine types and commands. The Application Definition(AppDef) describes the applications interface for applications that are deployed on JARVICE with PushToCompute.
Requirements
The examples on this page assume users are using a terminal on Linux or MacOS. The following 3rd party applications are required:
- Docker CE or EE: https://docs.docker.com/install/
- Docker registry: DockerHub offers free accounts for public repositories
Minimal Containers
Minimalist containers can be created directly from DockerHub official images. The resulting JARVICE applications will start a gotty terminal during /sbin/init.
Minimal Ubuntu Xenial XRT
Create XRT Docker image
The following script will create a simple base XRT application. Save this locally as build-xrt.sh in it own directory (e.g. /tmp/build-xrt)
#!/bin/bash

DOCKER_TAG=${1:-xrt-test}
OS_DIST=${2:-16.04}
BASE_IMAGE=${3:-ubuntu:xenial}
XILINX_RELEASE=${4:-201920.2.3.1301}

XRT_RUNTIME=xrt_${XILINX_RELEASE}_${OS_DIST}-xrt.deb
# Create an AppDef for JARVICE
# Server command will start gotty via /sbin/init
cat << EOF > AppDef.json
{
    "name": "xilinx_base_xrt",
    "description": "Minimal XRT application for Alveo",
    "author": "example",
    "walltime": "00:30:00",
    "licensed": true,
    "classifications": [
        "FPGA",
        "Alveo"
    ],
    "machines": [
        "nx*u*"
    ],
    "vault-types": [
        "FILE",
        "BLOCK",
        "BLOCK_ARRAY",
        "OBJECT"
    ],
    "commands": {
        "Server": {
            "path": "/sbin/init",
            "interactive": true,
            "name": "Server",
            "description": "Launch a session with all boot services, including SSH (if installed).  Connection address and credentials will appear in your web browser once available.",
            "parameters": {}
        }
    },
    "image": {
        "data": "",
        "type": "image/png"
    }
}
EOF
# Create Docker container w/ Xilinx Runtime
cat << EOF > Dockerfile
FROM ${BASE_IMAGE}
ADD https://www.xilinx.com/bin/public/openDownload?filename=${XRT_RUNTIME} /xrt.deb
RUN apt-get update && apt install -y /xrt.deb curl
RUN rm /xrt.deb
ADD AppDef.json /etc/NAE/AppDef.json
RUN curl --fail -X POST -d @/etc/NAE/AppDef.json https://api.jarvice.com/jarvice/validate
EOF
# Build Docker image
docker build -t ${DOCKER_TAG} ${PWD}
We can build the Ubuntu Docker container with:
cd /tmp/build-xrt
chmod +x build-xrt.sh
./build-xrt.sh
Note: build-xrt.sh may require sudo permissions to use docker. Add your Linux user to the docker group to avoid elevated permissions
By default, build-xrt.sh will tag an image locally called xrt-test.
docker images | grep xrt-test
This image will need to be pushed to a Docker registry to use with PushToCompute. This example will use DockerHub.
Set DOCKER_USER to your DockerHub account
DOCKER_USER=<your-DockerHub-account>
Tag and push the XRT Docker image to DockerHub
docker tag xrt-test ${DOCKER_USER}/xrt-test:minimal
docker push ${DOCKER_USER}/xrt-test:minimal
Note: New pushes to DockerHub will create a public repository by default. You must create a private repository before pushing to it if you do not wish your images to be public.
The new XRT docker image will now be available on your Docker registry.
Minimal Ubuntu Bionic XRT
Follow the same steps in Minimal Ubuntu 16.04 XRT with the following build-xrt.sh:
#!/bin/bash

DOCKER_TAG=${1:-xrt-test}
OS_DIST=${2:-18.04}
BASE_IMAGE=${3:-ubuntu:bionic}
XILINX_RELEASE=${4:-201920.2.3.1301}

XRT_RUNTIME=xrt_${XILINX_RELEASE}_${OS_DIST}-xrt.deb
# Create an AppDef for JARVICE
# Server command will start gotty via /sbin/init
cat << EOF > AppDef.json
{
    "name": "xilinx_base_xrt",
    "description": "Minimal XRT application for Alveo",
    "author": "example",
    "walltime": "00:30:00",
    "licensed": true,
    "classifications": [
        "FPGA",
        "Alveo"
    ],
    "machines": [
        "nx*u*"
    ],
    "vault-types": [
        "FILE",
        "BLOCK",
        "BLOCK_ARRAY",
        "OBJECT"
    ],
    "commands": {
        "Server": {
            "path": "/sbin/init",
            "interactive": true,
            "name": "Server",
            "description": "Launch a session with all boot services, including SSH (if installed).  Connection address and credentials will appear in your web browser once available.",
            "parameters": {}
        }
    },
    "image": {
        "data": "",
        "type": "image/png"
    }
}
EOF
# Create Docker container w/ Xilinx Runtime
cat << EOF > Dockerfile
FROM ${BASE_IMAGE}
ADD https://www.xilinx.com/bin/public/openDownload?filename=${XRT_RUNTIME} /xrt.deb
RUN apt-get update && apt install -y /xrt.deb curl
RUN rm /xrt.deb
ADD AppDef.json /etc/NAE/AppDef.json
RUN curl --fail -X POST -d @/etc/NAE/AppDef.json https://api.jarvice.com/jarvice/validate
EOF
# Build Docker image
docker build -t ${DOCKER_TAG} ${PWD}
Minimal CentOS 7.4.1708 XRT
Follow the same steps in Minimal Ubuntu 16.04 XRT with the following build-xrt.sh:
#!/bin/bash

DOCKER_TAG=${1:-xrt-test}
OS_DIST=${2:-7.4.1708}
BASE_IMAGE=${3:-centos:7.4.1708}
XILINX_RELEASE=${4:-201920.2.3.1301}

XRT_RUNTIME=xrt_${XILINX_RELEASE}_${OS_DIST}-xrt.rpm
# Create an AppDef for JARVICE
# Server command will start gotty via /sbin/init
cat << EOF > AppDef.json
{
    "name": "xilinx_base_xrt",
    "description": "Minimal XRT application for Alveo",
    "author": "example",
    "walltime": "00:30:00",
    "licensed": true,
    "classifications": [
        "FPGA",
        "Alveo"
    ],
    "machines": [
        "nx*u*"
    ],
    "vault-types": [
        "FILE",
        "BLOCK",
        "BLOCK_ARRAY",
        "OBJECT"
    ],
    "commands": {
        "Server": {
            "path": "/sbin/init",
            "interactive": true,
            "name": "Server",
            "description": "Launch a session with all boot services, including SSH (if installed).  Connection address and credentials will appear in your web browser once available.",
            "parameters": {}
        }
    },
    "image": {
        "data": "",
        "type": "image/png"
    }
}
EOF
# Create Docker container w/ Xilinx Runtime
cat << EOF > Dockerfile
FROM ${BASE_IMAGE}
ADD https://www.xilinx.com/bin/public/openDownload?filename=${XRT_RUNTIME} /xrt.rpm
RUN yum install -y epel-release && yum install -y /xrt.rpm curl
RUN rm /xrt.rpm
ADD AppDef.json /etc/NAE/AppDef.json
RUN curl --fail -X POST -d @/etc/NAE/AppDef.json https://api.jarvice.com/jarvice/validate
EOF
# Build Docker image
docker build -t ${DOCKER_TAG} ${PWD}
Enable NIMBIX Desktop
Using the Dockerfile from a previous example, add this code block to your Dockerfile:
- For Ubuntu: image-common
- For CentOS: image-common
Build the Docker image and push to your Docker Registry:
docker build -t xrt-test ${PWD}
docker tag xrt-test ${DOCKER_USER}/xrt-test:desktop
docker push ${DOCKER_USER}/xrt-test:desktop
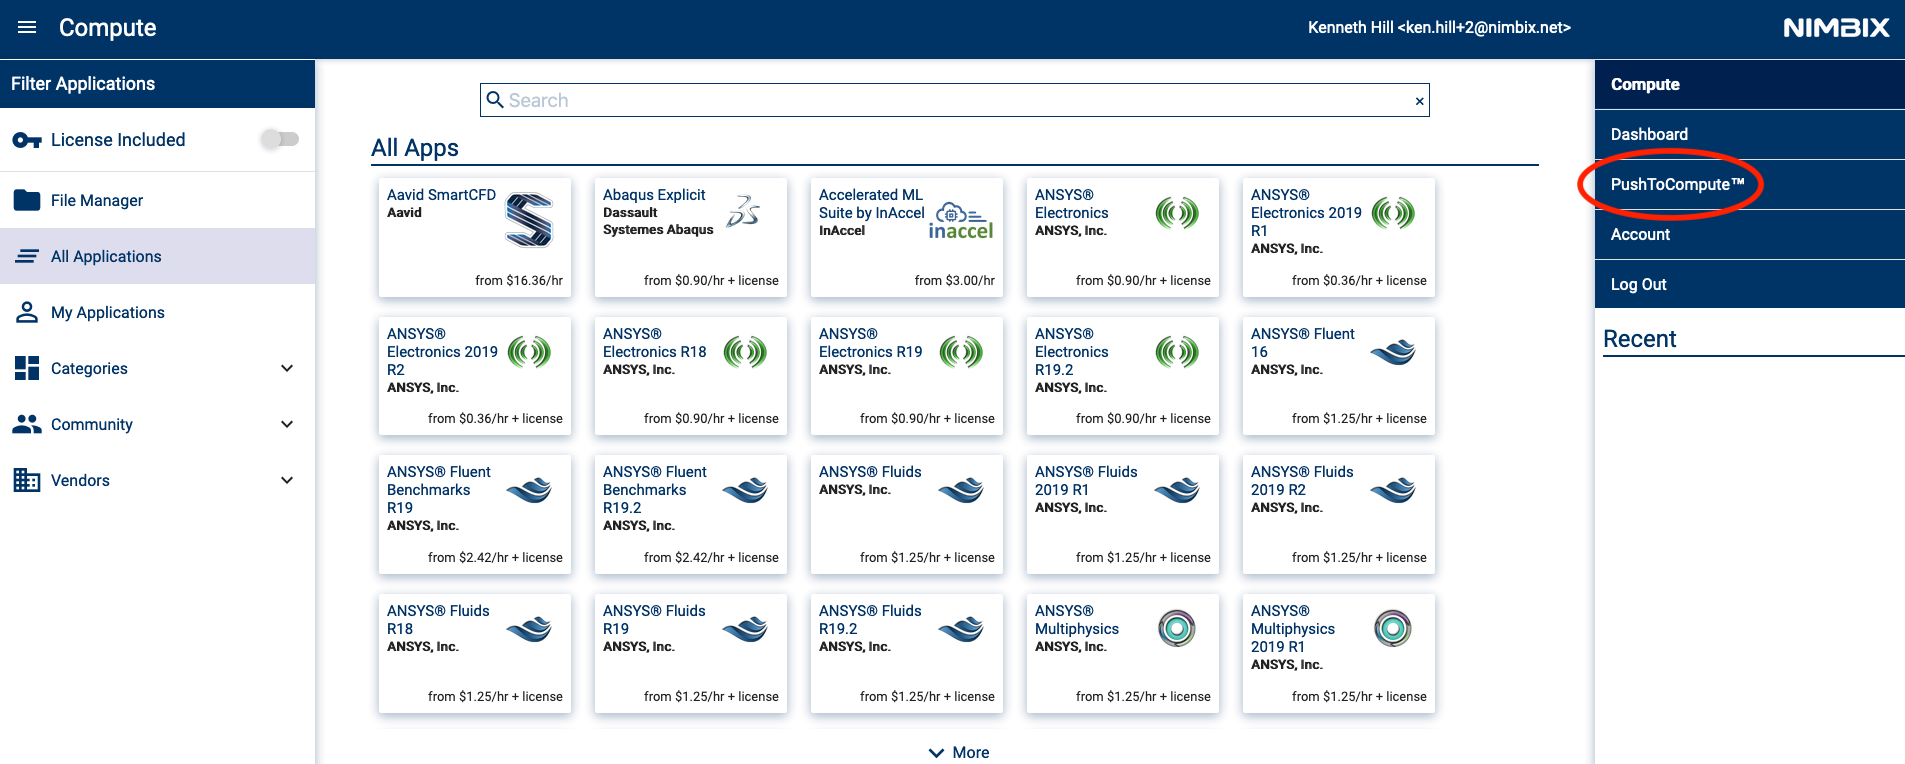
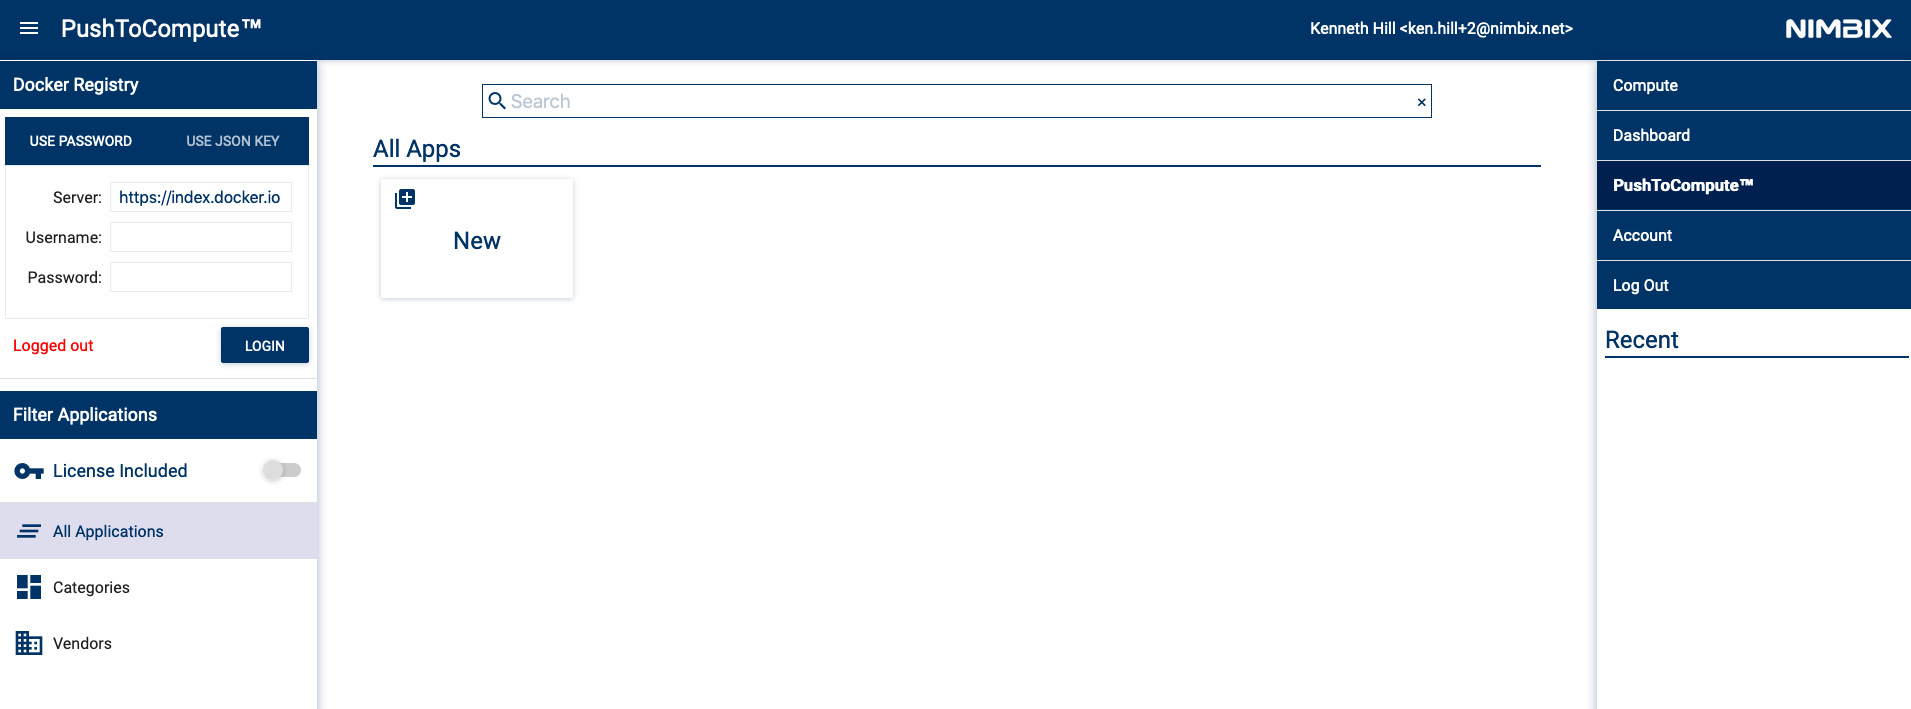
Create a new JARVICE application with PushToCompute
- Login into JARVICE
-
Select the PushToCompute tab on the right
-
Login to the Docker Registry on the left
-
Create a new JARVICE application by clicking the New card
-
Fill in the
App IDandDocker Repositoryinformation and selectOK
Note: Fill in the correct information for your
Docker Repository -
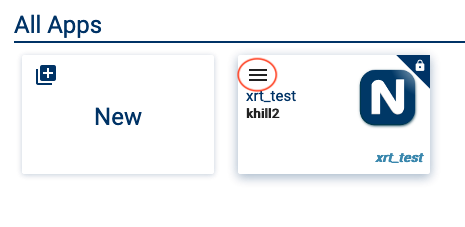
Open the application menu by selecting the stacked icon on the upper left
-
Select
Pullto pull the Docker image from the Docker registry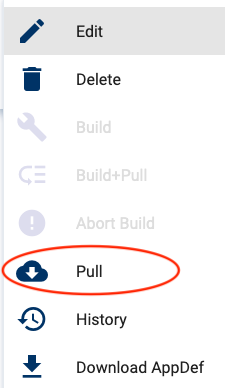
-
Click
OKto confirm the pull request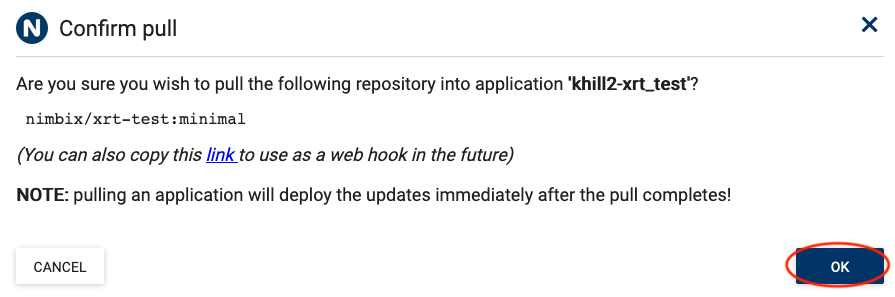
-
Open the application menu and select
History - Wait for the
Pullrequest to complete
Congratulations! You now have a custom JARVICE App w/ Xilinx Runtime for Alveo.
Start JARVICE XRT App
-
Open the PushToCompute tab
-
Click on the
xrt_testapplication card -
Select the
Serverworkflow.
-
Select the desired
Machine typeandSUBMITthe job. This will redirect to the JARVICE Dashboard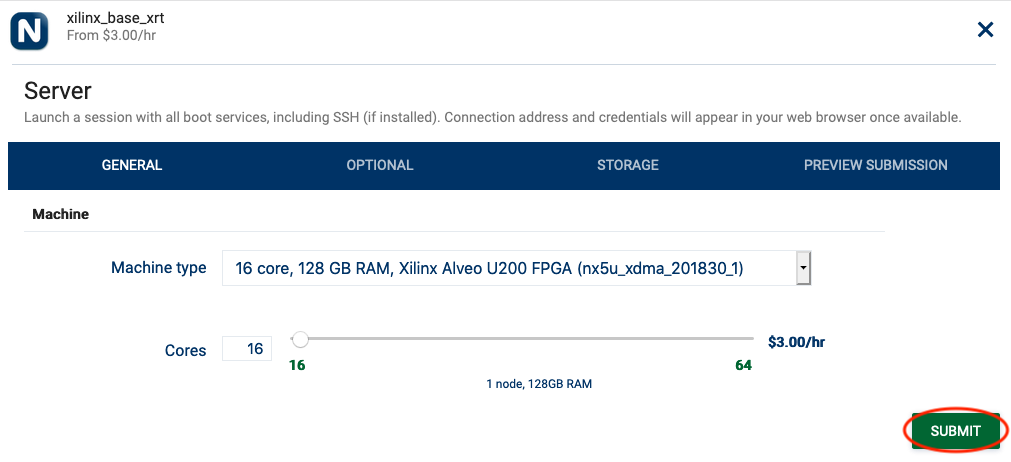
-
Examples on this page are limited to 30 minutes of compute time. Click
OKto continue.
See NOTES at the end of the page for additional information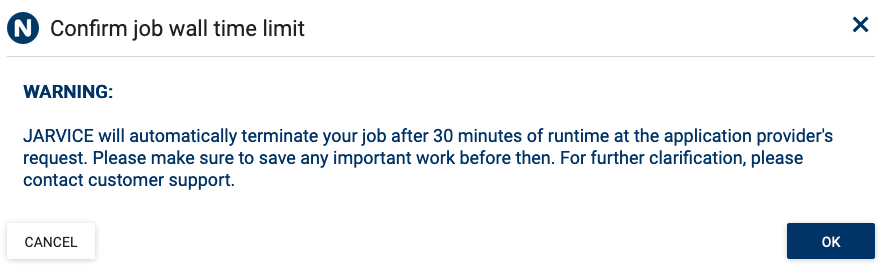
-
Wait for the job to start and click on
Click here to connect(can take a few minutes).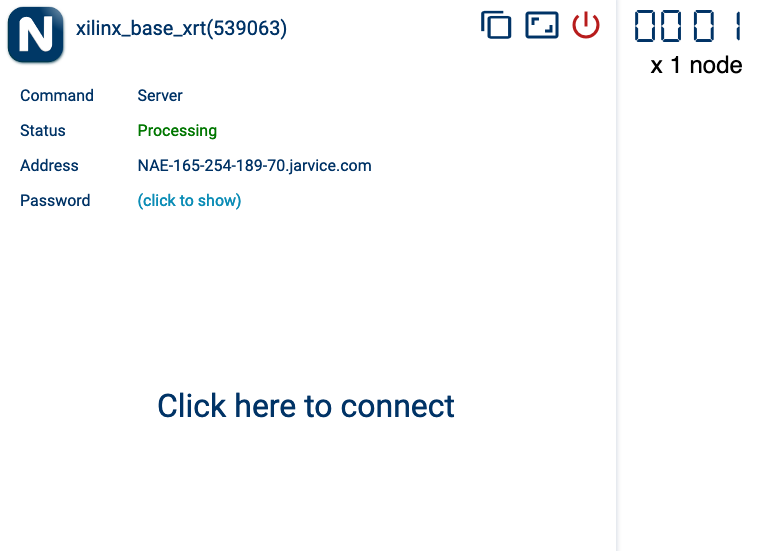
For minimal XRT Apps
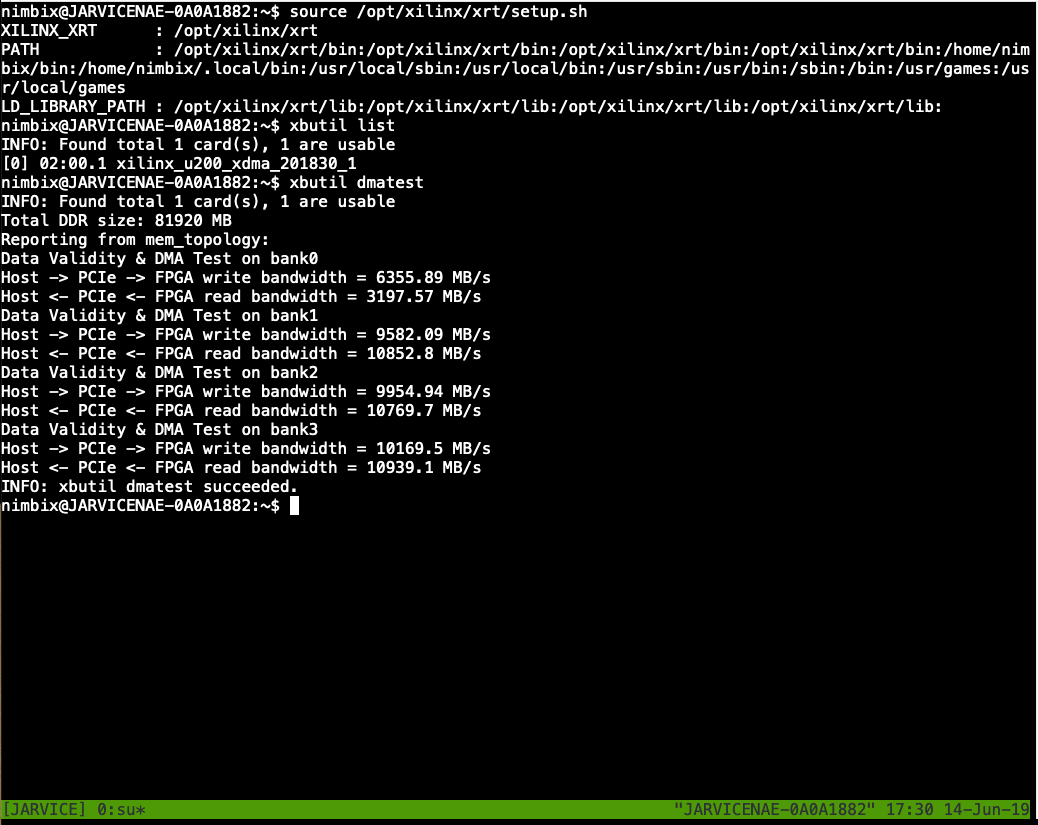
You will now be connected to a gotty terminal for your job. Perform a DMA test on the Alveo accelerator:
# Configure bash w/ the XRT environment
source /opt/xilinx/xrt/setup.sh
# List the available Alveo accelerators
xbutil list
# Run the DMA test on the first Alveo accelerator
xbutil dmatest
Sample output:
Shutdown the job on the JARVICE Dashboard by clicking the shutdown button on the App card

You now have a base XRT image that can be customized for your Alveo workflow. Edit the existing Dockerfile and AppDef.json to add your software and *.xclbin files to create your own JARVICE accelerated application.
For Desktop XRT Apps
You will now be connected to a desktop environment for your job. Perform a DMA test on the Alveo accelerater:
-
Open a terminal
-
Run the DMA test
# Configure bash w/ the XRT environment
source /opt/xilinx/xrt/setup.sh
# List the available Alveo accelerators
xbutil list
# Run the DMA test on the first Alveo accelerator
xbutil dmatest
Shutdown the job on the JARVICE Dashboard by clicking the shutdown button on the App card
You now have a base XRT image that can be customized for your Alveo workflow. Edit the existing Dockerfile and AppDef.json to add your software and *.xclbin files to create your own JARVICE accelerated application.
NOTES
DockerfileandAppdef.jsonexist in your working directly. You do not need to usebuild-xrt.sh. The files can be edited directly and built withdocker build.- The examples on this page are limited to a 30 minute of compute time. Remove
"walltime": "00:30:00",fromAppDef.jsonfor Apps that do not require a compute limit.